- Details
- Hits: 8757
We are introducing Windows Server 2012 R2 into our Production environment at work. I decided I would use PowerShell Remoting to install the ADS services and promote the server to Domain Controller.
First step is to remote to the 2012 R2 server. You can do this from any PC that has PowerShell installed. I'm doing it from my Windows 7 PC.
PS C:\>Enter-PSSession -ComputerName RemoteServer -Credential yourdomain\yourusername
If all goes well your prompt should change to the following:
[RemoteServername]: PS C:\>
This means you are now connected to the remote server and any command you run will execute on the remote server. This includes DOS commands. Now we need to run the following command to install the ADS Role:
Install-WindowsFeature -Name AD-Domain-Services -IncludeManagementTools
You will see the following message showing install progress:

When complete you should get a confirmation:
Success Restart Needed Exit Code Feature Result
------- -------------- --------- --------------
True No Success {Active Directory Domain Services, Remote ...
You can also run the following command to verify install:
[RemoteServername]: PS C:\>Get-Command -Module ADDSDeployment
CommandType Name ModuleName
----------- ---- ----------
Cmdlet Add-ADDSReadOnlyDomainControllerAccount ADDSDeployment
Cmdlet Install-ADDSDomain ADDSDeployment
Cmdlet Install-ADDSDomainController ADDSDeployment
Cmdlet Install-ADDSForest ADDSDeployment
Cmdlet Test-ADDSDomainControllerInstallation ADDSDeployment
Cmdlet Test-ADDSDomainControllerUninstallation ADDSDeployment
Cmdlet Test-ADDSDomainInstallation ADDSDeployment
Cmdlet Test-ADDSForestInstallation ADDSDeployment
Cmdlet Test-ADDSReadOnlyDomainControllerAccountCreation ADDSDeployment
Cmdlet Uninstall-ADDSDomainController ADDSDeployment
Now to join the current server to the domain as a Domain Controller use the following command:
[RemoteServername]: PS C:\> Install-ADDSDomainController -Credential (Get-Credential) -DomainName contoso.com -DatabasePath D:\Windows\NTDS -LogPath D:\Windows\NTDS -SysvolPath D:\Windows\SYSVOL -SiteName NameOfSite
There are several other options that can be used but these three are important. At first I did not pass the -Credential argument thinking it would use the credentials I used to PSRemote to the server but when I ran the Install-ADDSDomainController command I received an error "Install-ADDSDomainController : Verification of user credential permissions failed. Failed to examine the Active Directory forest. The error was: ldap_search()". When I used the -Credential (Get-Credential) the command succeeded with no problems. Also, If you don't use -DatabasePath the database will install to:
%SYSTEMROOT%\NTDS
For a full list of options go here:
http://technet.microsoft.com/en-us/library/hh974723.aspx
You will be prompted for the Safe Mode Administration Password. You will then see a message stating server will be configured as a Domain Controller and restarted. Just hit enter as the default answer is Y.
You will see the progress as it installs and you may also see some warnings about "Delegation for this DNS server cannot be created because the authoritative parent zone cannot be found..." You may ignore this warning if you are not worried about external DNS queries.
If install is successful you will see the following:
Message Context RebootRequired Status
------- ------- -------------- ------
Operation completed successfully DCPromo.General.3 False Success
That is it. You have a new DC on your domain!
To demote a Domain Controller you can use the following command:
Uninstall-ADDSDomainController -Credential (Get-Credential)
- Details
- Hits: 6036
If you are running RDS 2008 R2 you may find you receive a non descriptive error when you try to publish InfoPath 2010 in Design mode. This app uses a command line switch to start in "Design" mode. When you publish the app via RemoteApp you will notice that the app will show that it has Arguments enabled.
This is the error message users will receive when they try to start the app:

A quick an easy fix is to use a VBScript to start Microsoft InfoPath. The script below will do the trick:
Dim objShell
Set objShell = WScript.CreateObject( "WScript.Shell" )
objShell.Run("""c:\Program Files (x86)\Microsoft Office\Office14\INFOPATH.EXE"" /DESIGN"),1,False
Set objShell = Nothing
Save the above using notepad as start-inforpath-design.vbs.
Publish a new app and this time browse to the location where you saved the script and select it as the app. Once published edit the security as usual and change the icon by browsing to the location of Info Path .exe. You will also want to change the display name to Microsoft InfoPath 2010.
- Details
- Hits: 3298
Exchange Autodiscover service is a very nice feature but you may run into issues with certificate errors or warnings if you don't have the URL's setup correctly.
For my lab environment I purchased an SSL Certificate for my public domain: mail.datawan.net. I decided to use a split DNS configuration where I would use the same URL for both internal and external access. This allows me to use one certificate for both internal and external access. This certificate works perfectly for ActiveSync and OWA services. But when setting up Outlook clients I always received an error about the certificate name not matching. I started by first looking at the settings under:
Microsoft Exchange On-Premises > Server Configuration > Client Access
I made sure to update the same URL for all the tabs below by double clicking and setting the InternalURL and ExternalURL to the same setting. For POP3 and IMAP4 just make sure that the URL for X.509 certificate name (under Authentication tab) is using the external URL. See Figure 1:

After doing this I started Outlook 2010 and still received the error message. After some searching around I found that there are a few other places where I would need to update the URL's but this time you have to use PowerShell. Start up the Exchange Management Shell and take a look at the following settings:
Get-ClientAccessServer | fl identity, autodiscoverserviceinternaluri
Get-WebServicesVirtualDirectory |fl identity,internalurl,externalurl
If you see the wrong URL in any of the output for InternalURL or ExternalURL you can fix it by using the following commands:
Set-ClientAccessServer -Identity EXCHSERVERNAME -AutoDiscoverServiceInternalUri https://mail.yourdomain.com/Autodiscover/Autodiscover.xml
Set-WebServicesVirtualDirectory -Identity "EXCHSERVERNAME\EWS (Default Web Site)" -InternalUrl https://mail.yourdomain.com/EWS/Exchange.asmx
There are other settings you could configure but the above settings should fix the certificate not matching on the name. Keep in mind you will have to create a zone for your internal DNS servers for your external domain and point to internal IP Address for the services.
- Details
- Hits: 3415
I don't think many Exchange 2010 Production environments will run into this issue but this may be helpful to someone running in Dev/Test environment where resources may be somewhat limited.
In Exchange 2007 and 2010 the Transport service monitors resources like disk space and memory. If resources hit a specific threshold the service will stop receiving email. You will be able to send email but not receive. For example the default value for free disk space for queue database is 500MB.
You can find more information here: http://technet.microsoft.com/en-us/library/bb201658.aspx
The one thing I don't like is that when this happens event viewer is not always helpful and if you test connectivity using Microsoft Remote Connectivity Analyzer the error makes it seem more like a disk space issue. See image below.
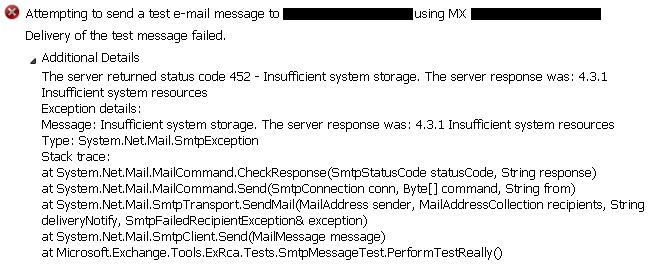
In my case the memory use was at 92% on my Edge Transport server. Since I run VM's it was a quick fix to add an additional 1GB memory. Server booted up and email started to flow normally. It took me a little while to figure out it was memory as the first thing I checked for was low disk space but I had over 20GB free on the data disk. Email had also been flowing correctly for several months. But once I thought to check memory usage it was clear the system needed more RAM.
- Details
- Hits: 2500
The code below will let you store an encrypted password to disk for use in scripts. The user used to create encrypted password must be the same user that will run the script.
Encrypt the password:
(Get-Credential).password | ConvertFrom-SecureString | set-content c:\scripts\cred.txt
The Encrypt password is now ready for use. You can use it inside your code like this:
$user = 'domain\username'
$cred = New-Object System.Management.Automation.PsCredential $user,(Get-Content C:\scripts\cred.txt | ConvertTo-SecureString)
If you want to include a clear txt password in your script you can use the method below:
$user = 'domain\username'
$password = ConvertTo-SecureString 'PlainTextPassword' -AsPlainText -Force
$cred = New-Object System.Management.Automation.PsCredential $user, $password
Page 2 of 4
- You are here:
-
Home

- Microsoft