I had a friend ask help in creating a shortcut link in Windows 7 under My Computer Network Locations. This is the place where mapped drives usually show up. I will not go into why a mapped drive would not work.
I knew that powershell could do this and quickly found lots of information on creating shortcuts on the Desktop, startup, My Documents, and other locations but nothing on creating under My Computer. PowerShell has many Environment variables available to use. There are Special folder variables that hold the path to well known locations like My Computer, My Documents, ApplicationData, etc. To see a complete list use this command:
I then proceeded to test a few scripts to create the shortcut under My Computer location and it was not working. I could create the shortcut anywhere else except under My Computer > Network Locations. When you run the following command:
you will see the physical path to all the locations available under System.Environment+SpecialFolder and one thing I noticed is that MyComputer had a blank for location. So where was the .lnk file stored? I manually created a shortcut and searched the C:\ and from there it was easy. It turns out the shortcut is stored under [Environment]::GetFolderPath("ApplicationData")\Microsoft\Windows\Network Shortcuts\. Once armed with that information I created the following script:
[Environment]::GetFolderPath("ApplicationData") $path = [Environment]::GetFolderPath("ApplicationData") + "\Microsoft\Windows\Network Shortcuts\ShortcutName.lnk" $comobject = New-Object -comObject WScript.Shell $link = $comobject.CreateShortcut($path) #targetpath can be UNC path or physical path to .exe $link.targetpath = "\\server\share" $link.IconLocation = "%SystemRoot%\system32\imageres.dll,137" $link.Save()
One thing to note is that [Environment]::GetFolderPath("ApplicationData") will not work for everyone. In some cases this will get you to wrong path and at that point you can just build the path using other environment variables like $env.username & $env.systemdrive.
The IconLocation needs two things. The path to a dll or exe and the number of which image to display. In this case I'm using imageres.dll which has a lot of icons to choose from.
Hope this helps someone. I did some googling and never found an answer.
Hyper-V has a snapshot feature that allows you to take a point in time picture of current server configuration. This is a very handy feature for development enviroments as well as production. I wanted to share a few key items to keep in mind when making use of this feature.
The more snapshots or checkpoints you have the more you will affect performance. I am not aware of a best practice or recommended limit but I have noticed that keeping the count to 5 or less keeps performance at good levels. Also note that for very large guest servers with more than 8GB RAM I would limit that number further.
DO NOT USE snapthots or checkpoints as a backup replacement. There is no real way to manage that many snapshots and your guest server performance will decrease as snapshots increase.
It is easy enough to delete snapthots or checkpoints. If you are using the Hyper-V Management tool you simply select the server for which you want to delete a snapshot for and in the windows below labeled Snapshots right click the snapshot you wish to delete and select Delete Snapshot... If you are using SCVMM 2008 then you would right click on the server and select Manage Checkpoints. Next highlight the checkpoint you wish to delete and on the right click the Remove button.
The more time that passes after you have taken a snapshot/checkpoint the longer it will take to merge that VHD. It is a good idea to merge snapshots a few days or weeks after being taken.
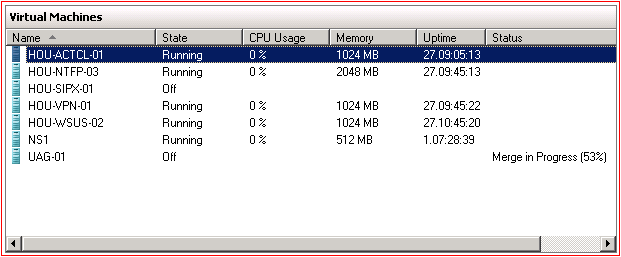
NOTE: When you delete a snapshot or checkpoint you must power down the server to allow the actual snapshot files to be merged into the main VHD File. Simply going through the processes stated above will NOT finish the job. This merge process starts automatically and I don't believe there is a way to control it. You can view the merge progress via the Hyper-V Manager tool. See Image below. This process can take some time to complete depending on your Host Server hardware and the size and number of snapshots you deleted.
We had a windows 2003 Server that after a reboot we could not login to the Domain or get to the internet. Basically the NIC seemed to be non-operational. We could not Ping the server but we could ping the local loop and local IP. So I started troubleshooting routing and that led nowhere quick.
I ran through the steps and noticed that the entire IPSec Registry Key was missing so I knew we were on the right track. Before running the command to recreate the Key and values I manually created the IPSec Key and Policy sub-key. Then ran the following command:
regsvr32 polstore.dll
And that did the trick! Server rebooted and came up normal with no issues.
There are a few modules and PSSnapin I always like to use with PowerShell. My initial setup and customization is not complicated at all but sometimes I forget what the profile.ps1 needs and path to use for profile.ps1 file.
My setup consists of 3 main things.
Additional PS-Snapins
Modules
Profile.ps1 to load environment.
The place I like to use for profile.ps1 is %windir%\system32\WindowsPowerShell\v1.0\profile.ps1 because this applies to all users. If you don't want the profile loading for ALL users then maybe use: %UserProfile%\My Documents\WindowsPowerShell\Microsoft.PowerShell_profile.ps1
The contents of the profile.ps1 only contain the following:
'C:\Program Files\Microsoft System Center 2012\Virtual Machine Manager\bin\psModules\virtualmachinemanagercore\virtualmachinemanagercore.psd1'
You can add more PSSnapin or modules if needed but these are the ones I use the most. Save this file to preferred location mentioned above and that's it.
I only mention the following because I see it asked a lot. In order for the PSSnapin and Module commands in the profile.ps1 file to work you must first install the necessary components. For modules you simply copy the folder/files to:
%windir%\system32\WindowsPowerShell\v1.0\
For PSSnapin you must download the application from vendor and install.
UPDATE - PSSnapin's are slowly going away. The preferred method is for developers to provide Modules. Case in point starting with PowerCLI 6.0 VMware is transitioning to Modules. You can read more here:
If you did not use the import/export feature to move your VHD from Hyper-V server to same server after rebuild or new server you may encounter some issues.
One such issue is that you may receive an error when trying to set the IP address on the guest OS. The message you may receive is "The IP address you have entered for this network adapter is already assigned to another adapter (microsoft Virtual machine Bus Network Adapter) which is no longer present in this computer." To assign the IP you need do the following:
Go to command prompt and type set devmgr_show_nonpresent_devices=1
Start device manager by typeing start devmgmt.msc
In device manager click View>show hidden devices
Go to Network Adapters and you should see the conflicting device. Remove It.
You should now be able to assign the IP Address.
Next time it's best to use the Import/Export feature.
UPDATE: The issue I ran into can be avoided by first uninstalling the NIC from the guest OS using Device Mager.