The Netscaler has very advanced Content Switching features. What is Content Switching? From the NetScaler help files:
"Content Switching enables the NetScaler appliance to direct requests sent to the same Web host to different servers with different content. For example, you can configure the appliance to direct requests for dynamic content (such as URLs with a suffix of .asp, .dll, or .exe) to one server and requests for static content to another server. You can configure the appliance to perform content switching based on TCP/IP headers and payload."
One very useful basic function for Content switching is the ability to run multiple websites on different webservers on one public IP. In my case I have two webservers I want to publish to the internet but only 1 public IP. This is very easy to accomplish with the NetScaler.
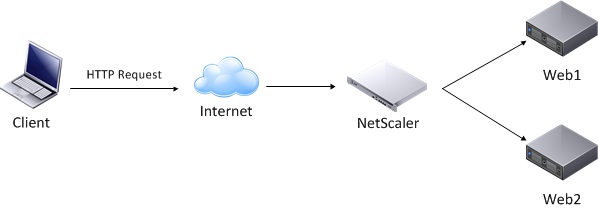
First let's look at a quick simple diagram of what we are trying to accomplish:
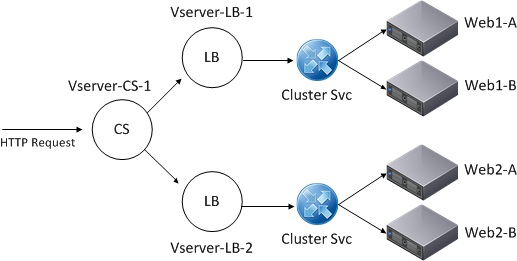
Looking at diagram 1 above we have an internet client making an HTTP request. The NetScaler receives this request and examines the HTTP.REQ.FULL_HEADER and uses a Policy to match the header. In my case I am looking for name1.domain.com. name1 will be forwarded to Web1 cluster. Diagram 2 shows a conceptual image of the steps the NetScaler takes to make the routing decisions.
Now let's jump into the steps necessary to complete the scenario above. I'm using NetScaler VPX running V.10 Build 70.7.nc.
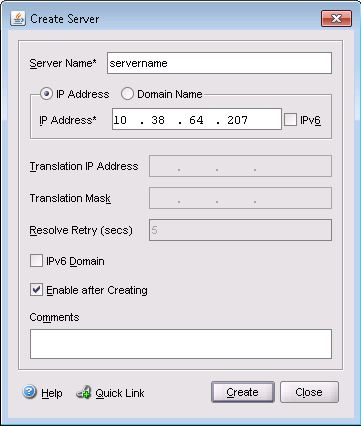
The first step is to add the web servers under Load Balancing. Using the GUI expand Load Balancing select Servers and click Add... Provide Server Name, IP Address and Comments if you desire. Click create to finish. Repeat this step for all servers.
Next we will create two services one for each website. Under Load Balancing still click Services then Add... Type a name for your service (I used the name of the site), choose the server from the drop down list that is hosting the site, select HTTP as the Protocol, and finally select a monitor (I would suggest http or http-ecv). Click create and repeat for the other website.
Now we will create two Virtual Servers. Under Load Balancing click Virtual Servers then click Add... Type a name for the VS, Select HTTP as the Protocol, Type the VIP (This is the Virtual IP and NOT the IP of any webserver) you plan to use for the given website. Leave other defaults and under Services select the service that corresponds to the new VS you are creating. Repeat for second VS.
Now let's move over to Content Switching. Select Content Switching then Policies. Click Add... to create our first Policy. Give the Policy a friendly name and under Expression type the following:
Where "name" is the prefix of the first site. Click OK to finish and repeat providing the second name under Expression.
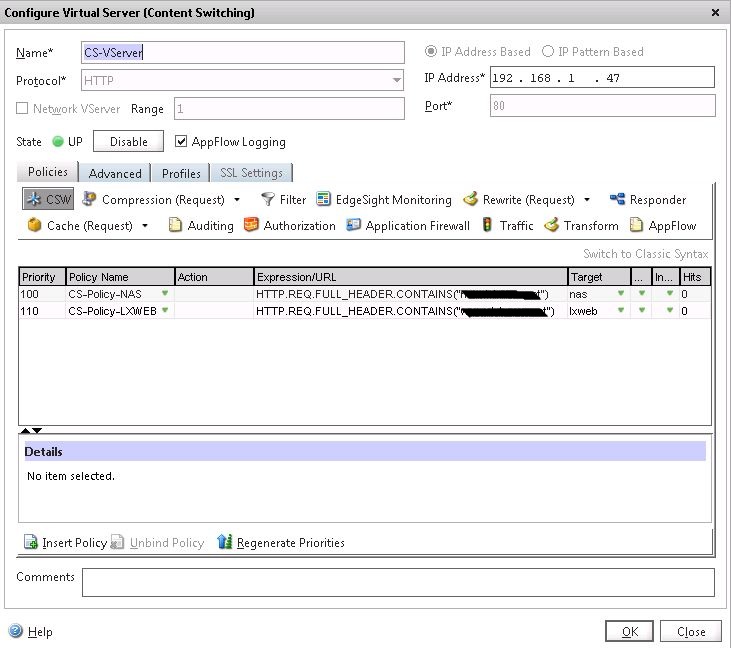
Finally move up to Virtual Servers still under Content Switching and click Add... to create our CS VServer. Give it a friendly name and select HTTP for Protocol. Type the IP Address you will be using to listen for HTTP traffic. This is a VIP that will listen for ALL HTTP Traffic for both websites. Under Policies select CSW and at the bottom click Insert Policy. Select the first Policy Name and under Expression/URL select the expression that matches the Policy. For Target select the corresponding Server we created earlier under Load Balancing > Servers. Click OK to create. Your screen should look similar to Diagram 3 below:
That is it. If this is a public website then all you should have to do is NAT the public IP and point it to the CS VIP created instep 5 and test. I usually like to test the Load Balancing first to make sure there are no problems there and then test the CS Server.
One last thing to Note. You are able to accomplish the same for HTTPS traffic but you will require a Wildcard SSL Certificate as there is no way to assign different certificates to the CS Vserver.
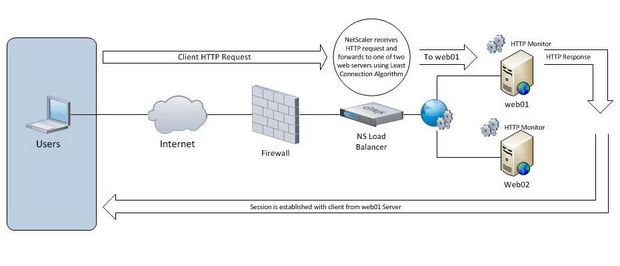
Step by Step on creating a load balance virtual server using a NetScaler.
In this scenario we have two identical web servers running 2008 R2 SP1 serving up a static HTML webpage. Both servers have the exact website replicated.
Web01 – 10.38.64.207 Web02 – 10.38.64.209
The Netscaler VIP for the web service is 10.38.64.247
The first step is to create Server Objects that represent the back-end webservers we will be load balancing. Repeat this step for the number of servers you are using.
1. Expand NetScaler > Load Balancing > Servers
2. click Add.
3. Fill in server name and IP and click Create:
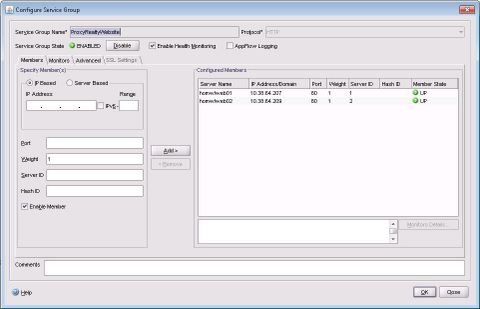
4. Next click Service Groups and click Add... Under Specify Members select Server Based and highlight the web servers you just created in step 3. Select port, weight and click Add > button. Weight lets you give a particular server higher preference to serve content and works in conjunction with balancing algorithm you have selected. See Figure 3 below:
5. Next click the Monitors tab and use the built in http monitor. Click OK.
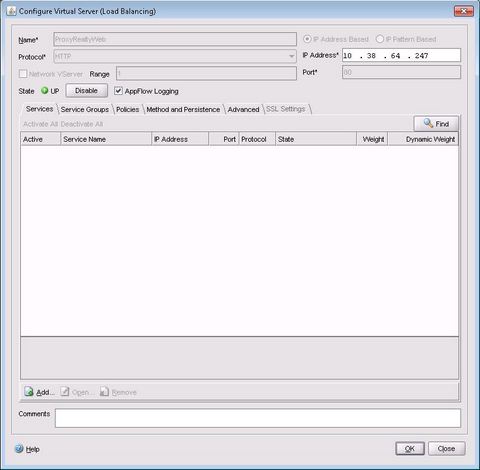
6. Finally select Virtual Servers and click Add... Fill in a Name for the Load Balancing virtual server, protocol, IP address (this is the VIP). Click Service Groups tab and select the previously created Service Group. Click Method and Persistence tab to select LB Method. For this example we will leave default of Least Connection. For Persistence we will use COOKIEINSERT and leave default Time-out value of 2 minutes. Click OK to create. See Figure 4
That is it! We have just created a simple load balance virtual server on the NetScaler that will balance connections based on "Least Connection" algorithm between two identical IIS 7.5 web servers.
When running PS 4.0 or 4.5 and WebInterface 4.X and Pass-Thru authenticatio is enabled clients using ICA Client 10.15 will not be able to connect to Published Desktops. Published Apps do work properly. The error is "ICA Client Configuration Manager: Could not find the file named (C:\...\launch.ica). Error 2306. See imag below:
The problem is specific to Internet Explorer v6 and 7 with v10.15 of the ICA client. A workaround is to make the following registry change on the Client workstation: Change the registry value HKEY_LOCAL_MACHINE\SOFTWARE\Citrix\ICA Client\Engine\Lockdown Profiles\All Regions\Lockdown\Client Engine\ICA File
Reg_SZ == RemoveICAFile Change from "*" to "False" Value == False