- Details
- Hits: 3032
To check version of currently installed module:
PS C:\>Get-Module AzureRM -list | Select-Object Name,Version,Path
To install module:
PS C:\>Install-Module AzureRM
If you need to first uninstall existing older version:
PS C:\>Uninstall-Module AzureRM
To login to Azure:
PS C:\>Login-AzureRmAccount
Once you are logged in is always a good idea to check what subscription you are defaulted to. This is important in case you have multiple subscriptions. You would not want to accidentally run certain command on a PROD subscription for example.
PS C:\>Get-AzureRmSubscription
You can switch to different subscription with:
PS C:\>Select-AzureRmSubscription -SubscriptionName 'MSDN Platforms'
For more details see this link.
- Details
- Hits: 6042
I finally decided to connect my home lab to Azure via Site-to-Site VPN. There are two basic flavors to choose from. Route based or Policy based. The choice depends partly on your needs but also your equipment. I would first start by searching for your edge device on this list. Note that just because your device is NOT listed doesn't mean you can't make a VPN connection. My Ubiquiti EdgeRouter is not on the list but I was able to get a connection using a Policy based VPN. For a lab a policy based is just fine, for a company or enterprise you will want a route based VPN or Express Route. I will paste the configuration I used below but want to first give credit to Netonkel Tech Blog. I tried a few different configurations I found online and none worked until I found his. My Ubiquiti Edge Router is running the latest firmware as of this writing v1.9.1.1.
STEP 1 - Configure Azure VPN:
The first step is to create your Virtual network gateway in Azure. I will assume you already have your VNETs and subnets configured. Remember that for a VPN you will need to create a Gateway subnet from the portal, POSH, or CLI. The name of the subnet is always GatewaySubnet.
Next we create a Virtual network gateway. The key parameters here are Gateway Type which for this case is VPN. The VPN type depends on your device (Where you will terminate VPN), in my case Policy-based. Choose your Virtual Network, Public IP, and finally location. Click Create button and wait ~45 minutes for completion.
Now we must create a Local network gateway, this is the information about your on-prem network. You will need to provide a Name, IP address (This is the public IP of your firewall/router), and Address space (This is your on-prem subnet i.e. 192.168.44.0/24).
Once you have a local network defined we can go back to Virtual network gateway and click Connections and Add button at top to create our new connection. You will need to provide Name, Connection Type, choose the existing Virtual network gateway, Local network gateway and finally provide a Shared Key (This is the password for the VPN Tunnel.)
PowerSHell Steps:
# If you don't have existing RG you want to use:
New-AzureRmResourceGroup -Name RG-Datawan-PD -Location 'SouthCentralUS'
# Setup some vars
$RG = 'RG-NAME'
$Loc = 'SouthCentralUS'
$subnet1 = New-AzureRmVirtualNetworkSubnetConfig -Name 'GatewaySubnet' -AddressPrefix 10.8.0.0/28
$subnet2 = New-AzureRmVirtualNetworkSubnetConfig -Name 'SubnetName' -AddressPrefix 10.8.1.0/27
# Create new VNET if needed. You can use existing of course.
New-AzureRmVirtualNetwork -Name 'YourVnetName' -ResourceGroupName $RG -Location $Loc -AddressPrefix 10.8.0.0/16 -Subnet $subnet1, $subnet2
$vnet = Get-AzureRmVirtualNetwork -ResourceGroupName $RG -Name 'YourVnetName'
Set-AzureRmVirtualNetwork -VirtualNetwork $vnet
# Create Local Network Gateway -GatewayIpAddress is your Public IP and -AddressPrefix your LAN
New-AzureRmLocalNetworkGateway -Name "YourSiteName" -ResourceGroupName $RG -Location $Loc -GatewayIpAddress '1.1.1.1' -AddressPrefix '10.4.4.0/24'
$gwpip = New-AzureRmPublicIpAddress -Name 'gw-pip' -ResourceGroupName $RG -Location $Loc -AllocationMethod Dynamic
$subnet = Get-AzureRmVirtualNetworkSubnetConfig -Name 'GatewaySubnet' -VirtualNetwork $vnet
$gwipconfig = New-AzureRmVirtualNetworkGatewayIpConfig -Name gwipconfig1 -SubnetId $subnet.Id -PublicIpAddressId $gwpip.Id
# Create new VNG
New-AzureRmVirtualNetworkGateway -Name 'yourname-vng' -ResourceGroupName $RG -Location $Loc -IpConfigurations $gwipconfig -GatewayType Vpn -VpnType PolicyBased -GatewaySku Basic
# Get Azure Public IP
Get-AzureRmPublicIpAddress -Name gw-pip -ResourceGroupName $RG
$gateway1 = Get-AzureRmVirtualNetworkGateway -Name 'yourname-vng' -ResourceGroupName $RG
$local = Get-AzureRmLocalNetworkGateway -Name 'YourSiteName' -ResourceGroupName $RG
# Crate a new connection on VNG
New-AzureRmVirtualNetworkGatewayConnection -Name AzureToYourSite -ResourceGroupName $RG -Location $Loc -VirtualNetworkGateway1 $gateway1 -LocalNetworkGateway2 $local -ConnectionType IPsec -RoutingWeight 10 -SharedKey 'YourSecret'
# Check Connection status
Get-AzureRmVirtualNetworkGatewayConnection -Name AzureToYourSite -ResourceGroupName $RG
STEP 2 - Configure On-Prem VPN:
Now we can SSH over to your edgerouter to create our tunnel. Be sure to enter configure mode first.
ubnt@fw:~$ configure
[edit]
set vpn ipsec esp-group esp-azure pfs disable
set vpn ipsec esp-group esp-azure mode tunnel
set vpn ipsec esp-group esp-azure proposal 1
set vpn ipsec esp-group esp-azure proposal 1 encryption aes256
set vpn ipsec esp-group esp-azure proposal 1 hash sha1
set vpn ipsec esp-group esp-azure compression disable
set vpn ipsec esp-group esp-azure lifetime 3600
set vpn ipsec ike-group ike-azure
set vpn ipsec ike-group ike-azure lifetime 28800
set vpn ipsec ike-group ike-azure proposal 1
set vpn ipsec ike-group ike-azure proposal 1 dh-group 2
set vpn ipsec ike-group ike-azure proposal 1 encryption aes256
set vpn ipsec ike-group ike-azure proposal 1 hash sha1
set vpn ipsec ipsec-interfaces interface eth0
set vpn ipsec logging log-modes ike
set vpn ipsec nat-traversal enable
set vpn ipsec auto-firewall-nat-exclude enable
set vpn ipsec site-to-site peer [AzurePublicIP]
set vpn ipsec site-to-site peer [AzurePublicIP] local-address any
set vpn ipsec site-to-site peer [AzurePublicIP] authentication mode pre-shared-secret
set vpn ipsec site-to-site peer [AzurePublicIP] authentication pre-shared-secret
set vpn ipsec site-to-site peer [AzurePublicIP] connection-type initiate
set vpn ipsec site-to-site peer [AzurePublicIP] default-esp-group esp-azure
set vpn ipsec site-to-site peer [AzurePublicIP] ike-group ike-azure
set vpn ipsec site-to-site peer [AzurePublicIP] tunnel 1
set vpn ipsec site-to-site peer [AzurePublicIP] tunnel 1 esp-group esp-azure
set vpn ipsec site-to-site peer [AzurePublicIP] tunnel 1 local prefix [YourLocalPrefix]
set vpn ipsec site-to-site peer [AzurePublicIP] tunnel 1 remote prefix [YourRemotePrefix]
set vpn ipsec site-to-site peer [AzurePublicIP] tunnel 1 allow-nat-networks disable
set vpn ipsec site-to-site peer [AzurePublicIP] tunnel 1 allow-public-networks disable
Always remember to commit and save your config.
ubnt@fw#commit
ubnt@fw#save
STEP 3 - Check Status:
Finally we can check status of VPN on both sides. On Azure Portal you can go to the Virtual network gateway and click Connections an verify you see "Connected". See below.

Or from the edge router run:
ubnt@fw#show vpn ipsec status
IPSec Process Running PID: 31574
1 Active IPsec Tunnels
IPsec Interfaces :
eth0 (34.23.123.3/21)
- Details
- Hits: 2636
PowerShell v5.0 on windows 10 adds syntax highlighting to your code. If you update your Windows 7/8 or Server 2008 R2/2012 R2 to .Net Framework 4.5/6 and WMF to 5.0 you will NOT get syntax highlighting. To add this feature launch PowerShell as Administrator and run the following command:
Install-Module PSReadline
Restart PowerShell and you should now see syntax highlighting.

- Details
- Hits: 3757
The following are simplified notes on patching a simple Lync 2013 Enterprise estate. For detail instructions always use: https://support.microsoft.com/en-us/kb/2809243.
- Login to first Lync server you wish to upgrade using the Lync Admin account. This account should be local admin and also have the necessary SQL rights if you are planning on updating the Database schema.
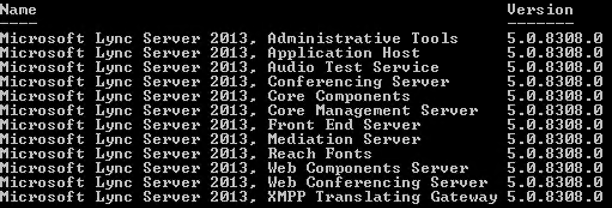
- I like to verify what version my current Lync tools are. Use the following PS Script:
Get-WmiObject -class Win32_Product | where {$_.name -like "*Lync Server*"} | Sort-Object Name | Select Name, Version | FT –AutoSize
- Next run the following command to verify Lync is in a "ready" state for upgrade.
Get-CsPoolUpgradeReadinessState

- Start upgrade on the first server in the first Upgrade Domain. Be sure to login using the Lync Admin account. If you plan to update the database schema once Lync Servers are all upgraded be sure the Lync Admin account has the necessary SQL rights. Run the following command to stop all Lync services:
Stop-CsWindowsService -Graceful
- Once all services are stopped you may run the Lync Server Cumulative Update Installer. Be sure to always check for latest version as the tool does get upgraded.
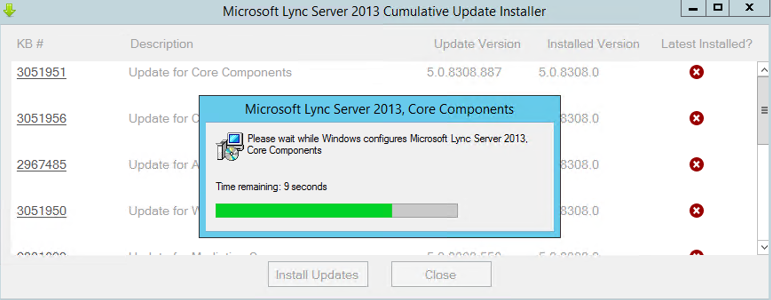
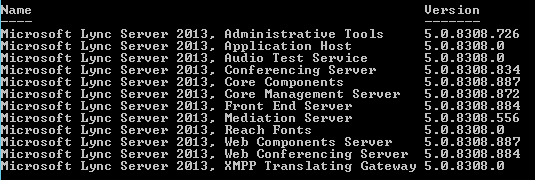
- When updates finish reboot the server. Login and run the command from step two above if you wish to verify versions installed. Your output will vary from image below.
- Repeat steps 1 - 6 for each Lync server you have in your estate. Work your way out from Front-End server to Edge server always waiting for a "Ready" state before continuing. If you do not you may cause corruption.
- When all Lync servers have been successfully upgraded you must check to see if a database update is necessary. Run the following command to verify.
Test-CsDatabase -ConfiguredDatabases -SqlServerFqdn yoursql.yourdomain.com -Verbose
If upgraded is needed run:
Install-CsDatabase -ConfiguredDatabases -SqlServerFqdn yoursql.yourdomain.com -Verbose
Pay attention for success messages and run the "Test-CsDatabase" again to verify. That's it. You're done!
- Details
- Hits: 3279
There may be times when you need to PS Remote to a server from a computer that is not in the domain. I have a new laptop that I have decided to keep off my domain. Here are the steps required to allow my Win8 PC to PSRemote to a 2012 R2 server.
1. On the Win8 computer run the following commands:
cd WSMan:\localhost\Client
Set-Item .\TrustedHosts -Value "*" -Force
2. On the 2012 R2 Server run the same commands:
cd WSMan:\localhost\Client
Set-Item .\TrustedHosts -Value "*" -Force
You may consider setting a value for TrustedHosts on the server. This will provide higher level of security. Value should be IP Address.
3. Verify WinRM service is running by running the following command from elevated PS session:
Test-WSMan -computername "targetPCname"
That should do it. You should be able to connect from the Win8 PC by entering the following in PS session:
$creds = get-credential
Enter-PSSession -ComputerName HOU-DC01 -Credential $creds
Two things to consider. You must use a variable for credentials. Using the -credential parameter and passing it a value inline does not work. Not sure if this is a bug. Also, to use the -UseSSL parameter you must configure a port. I have not shown you how to do that here.
Page 1 of 4
- You are here:
-
Home

- Microsoft