In Windows Virtual Server 2005 to mount a VHD as a drive you would use the VHDMount.exe program.  So to mount server1.vhd you would run the following command:

vhdmount /m /f d:\server1.vhd

The /m plugs the drive in and mounts a volume for use.  The /f mounts the volume without creating an undo disk.  That's it.  Pretty simple.  To unmount the drive you would just run the following command:

vhdmount /u d:\server1.vhd

Well, on Server 2008 R2 running Hyper-V it's even easier to mount a VHD.  Pleaese keep in mind the process I will show requires a full install of 2008 R2 (If you are running CORE you will have to use command line or powershell).

  1. Open up Server Manager and expand Storage
  2. Next Right-Click Disk Management and select Attach VHD.
  3. Browse to the location of the VHD you would like to mount and click OK. (You can also check Read-Only to mount the drive in read only mode.)
  4. The VHD will mount as a drive using the next available drive letter.
  5. To Unmount the VHD simply Right-Click on the Disk under Disk Management and select Detach VHD.


That's it!  Pretty easy.

n an Exchange 2007 environment BlackBerry Enterprise Server cannot be installed on the mail server as the BES software is not 64BIT compatible.

1. On the server you have selected to load BlackBerry Enterprise Server download and install “Microsoft Exchange Server MAPI Client and Collaboration Data Objects 1.2.1” which is available from the Microsoft Download site (a.k.a ExchangeMapiCdo.EXE). This will install the CDO and MAPI DLLs which are no longer available in Exchange 2007. This replaces the previous requirement to have Exchange System Manager installed as in Exchange 2000 or 2003 environments. The current download link


2. Log onto your Exchange Server using an account which has permissions to create an account. Open the Exchange Management Console and create a service account called BESadmin.

3. From the Exchange 2007 server open the “Exchange Management Shell” which can be found in the Exchange program group. From EMS run the following two scripts to set the delegate control and required permissions:

get-mailboxserver “<mail_server_name>” | add-exchangeadministrator “BESAdmin” –role ViewOnlyAdmin

get-mailboxserver “<mail_server_name>” | add-adpermission –user “BESAdmin” –accessrights ExtendedRight –extendedrights Send-As, Receive-As, ms-Exch-Store-Admin

4. Open Active Directory and from the View menu select "Advanced Features". Then go to each user that will be added to the BES and open their properties, go to the security tab and add the user BESadmin and add the security permission "Send As". (This will overcome some MS patches that prevent BES sending emails). Methods are available to add BESadmin "Send As" rights to all users if required but this method ensures only the required users have permissions added.

5. Make BESadmin a local Administrator of the server where you will be installing the BES software. This is done by right mouse clicking my computer and selecting “Manage”. From Computer Management expand “Local Users & Groups” and select Groups. From Groups double click “Administrators” and add BESadmin.

6. On the BES server go to “Administrative Tools” and open "Local Security Policy" and then expand the "Local Policies" and "User Right Assignment". You need to add BESadmin to "Log on Locally" and log on as Service".

7. Log onto the server where you will be installing the BES using the BESadmin account. Extract the install files and run the install file. Normally you select "BlackBerry Enterprise Server" as the install option once prompted as most sites don't use the MDS services for custom applications (MDS is a much heavier install). Follow the prompts of the install and the server will be required to restart half way through the install. Restart the server and log back on as BESadmin and the install will continue. (Make sure the Connect Test works and the SRP ID etc is validated during the install)

8. After the install is finished open BlackBerry Manager, an error will appear about MAPI client which you can just hit OK. The MAPI setting windows will appear so just add the server name back in and select "Check Name", if it resolves just hit OK and the manager will start.

9. Within Blackberry Manager click on Blackberry Domain in the left column and then the users SERVERS tab in the centre section, select your server within this tab and view the properties below. Ensure that "SRP Status:" is Connected (This can take a few minutes the first time so refresh the screen a few times). Once your status is connected you can start adding users.

10. Within Blackberry Manager click on your server name (The blue server) in the left column and then the users TAB in the centre section, just add a user and the click on that user. You will see all the users’ properties and a drop down menu called "Service Access” and select “Set Activation Password” and set a password of “a” for example.

11. Turn on you BlackBerry device and ensure Wireless is enabled. Go into “Options/Settings” and “Time & Date” and set the correct zone and time etc. Then from the home screen go to enterprise activation and enter the users email address and enter the password that was set in step 10. Press the track wheel and select Activate. Within a minute you should get data returned which indicates the process is functioning correct.


I recently setup my first Server 2008 Datacenter R2 Core.  The install is really no different than installing Server 2008 Full Install.  You just pick "Core" and go through the install steps.

The difference becomes apparent once you login to the server.  As you may be aware "Core" means no UI!  All you get is a Windows CMD Prompt.  I would not mind so much but the cmd prompt for 2008 Server is not like the Shell for Linux.  The commands seem long and there is no auto-complete.  Still I think if you are running Hyper-V role Core is the way to go.  Below are a few tips for the initial setup of Server Core.

To setup a static IP Do the following:

  1. netsh interface ipv4 show interfaces
  2. Make note of the IDX #
  3. Next Type netsh and hit enter
  4. At the netsh prompt type the following: interface ipv4 set address name="<ID>" source=static address=<StaticIP> mask=<SubnetMask> gateway=<DefaultGateway>
  5. Where ID is the IDX # from step 2
  6. To add DNS Servers at the netsh prompt type: netsh interface ipv4 add dnsserver name="<ID>" address=<DNSIP>index=1 Repeat to add 2nd server and increment index=2 etc.

To Join the server to a domain:

  1. netdom join <ComputerName> /domain:<DomainName> /userd:<UserName> /passwordd:*

Pay close attention to the spelling of userd & passwordd!

To add a domain user account to local Administrators group:

  1. net localgroup administrators /add <DomainName>\<UserName>

To rename the server:

  1. determine current name by typeing: hostname at the cmd prompt.
  2. Next type: netdom renamecomputer <ComputerName> /NewName:<NewComputerName>  Where <ComputerName> is the current name found in step above.

To restart or power off the server:

  1. shutdown /r /t 0 (Restarts the Server)
  2. shutdown /s /t 0 (Shuts Down the Server)

To activate the server:

  1. slmgr.vbs –ipk<productkey>
  2. slmgr.vbs -ato

Firewall Settings:

To enable MMC Remote Management:

  1. netsh advfirewall firewall set rule group="Remote Administration" new enable=yes

To enable Remote Management of the Firewall:

  1. netsh advfirewall set currentprofile settings remotemanagement enable

To enable RDP (Remote Desktop Access)

  1. For access from Vista, Win7, 2008 Use:  Cscript %windir%\system32\SCRegEdit.wsf /ar 0
  2. For access from Windows XP/2003/2008/Vista/7 Use:
    1. Cscript %windir%\system32\SCRegEdit.wsf /ar 0
    2. Cscript %windir%\system32\SCRegEdit.wsf /cs 0

To enable the Hyper-V Role:

  1. ocsetup Microsoft-Hyper-V

To enable DFS-R (Service only, not Namespace):

  1. ocsetup DFSR-Infrastructure-ServerEdition

Other considerations.  If you are running Windows 7 you will need to download Windows 7 Remote Administration Tools in order to use Hyper-V Manager and other windows 2008 tools.


Recommendations for pre-staging data:

(Make sure you have latest DFSR.EXE installed on all nodes before starting!)

  • ROBOCOPY.EXE - works fine as long as you do not use /copyall or /copy:S. As long as the root of the replicated folder has exactly the same ACL (including inheritance bits) on both machines, using Robocopy without /copyall (or /copy:s) will work as expected and files will not be modified in any way.
  • XCOPY.EXE - Xcopy with the /O switch will copy the ACL correctly and not modify the files in any way.

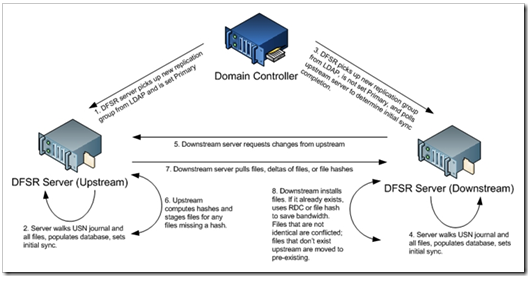
DFS-R initial sync no prestage:

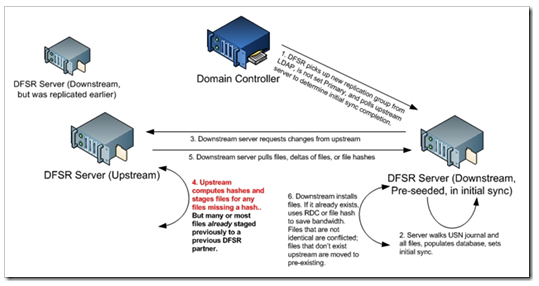
DFS-R with Prestage:


I added 3 Exchange servers to our environment for Disaster Recovery purposes and once I did that an mail-enabled Public Folder quit receiving external email.  What happened is that the new servers were not running Exchange services because they were in stand-by mode only to be used in case of a failover event.  But the problem was that in Active Directory they were listed as active exchange servers and apparently whichever server is listed first in the below PATH is the server that will handle email for mail-enabled Public Folders.

To fix the problem you need to go to the following ADsPath using ADSIEdit and remove the server(s) that are not active. Configuration\Configuration\Services\Microsoft Exchange\CompanyName\Administrative Groups\First Administrative Group\Servers\ServerName\Information Store\Storage Group Name The ServerName is the name of the server you want to remove from the list.  The Storage Group name is the one containing the Public Store. Right click on the Public Information store on the right.  Find the attribute named "msExchOwningPFTree" and click the CLEAR button.