- Details
- Hits: 648
Azure has many options for running containers. Today we will look at the Azure Container Service (ACS). This is a very simple option for running a single container.
Prerequisites:
You will need the following items in order to successfully complete this tutorial.
- Azure Subscription with at least Contributor Role.
- An Azure Container Registry
- A Linux VM running Docker version 24.0.2 or newer.
- Sudo permissions on the Linux VM
- Azure CLI for Linux
For this example, I'm going to create an ubuntu based container using Docker version 24.0.2.
Step 1
Execute the following command:
~$ docker run -ti --name=ubuntu-ops ubuntu:latest
This will download the latest ubuntu image, start the container and drop you into a bash shell.
Step 2
Now you can configure your container with your app or service. Let's install nginx, but first run the update command and upgrade local packages if necessary and exit the container.
~$ apt update
~$ apt upgrade
~$ apt install nginx -y
~$ exit
Step 3
Now we need to commit the changes to this image. We do this by passing the name of the container we used in Step 1 to the docker commit command.
~$ docker commit ubuntu-ops
If the command is successful, you will see output that starts with "sha256" and a guid.
Step 4
Now that our container has been committed, we need to find the image id. We do this by running the docker images command. We are looking for the image that has REPOSITORY and TAG set to <none>. Copy the image id to your clipboard and run the following command to tag the image with new tag. I will be using ubuntu-ops-base as the name for my new base image. You can pass a version number with ":" followed by your version number.
~$ docker tag IMAGE_ID ubuntu-ops-base:1.0.0
You can then run the docker images command to verify the image has been updated with the new tag. You should see the new image with updated name and version number.
~$ docker images
Step 5
Now we need to login to the Azure Portal and create an Azure Container Registry where we can push our local image. Once this image is successfully pushed to our Azure Registry, we can deploy the image to an Azure Container Instance "ACI".
Creating an Azure container registry is super simple so I will not detail all the steps here. But once you have created the registry navigate to Settings > Access Keys and enable "Admin User" to allow you to easily authenticate to the registry. You can also use Tokens for little better security. Once you enable "Admin User" you should see the information required to login to your registry.
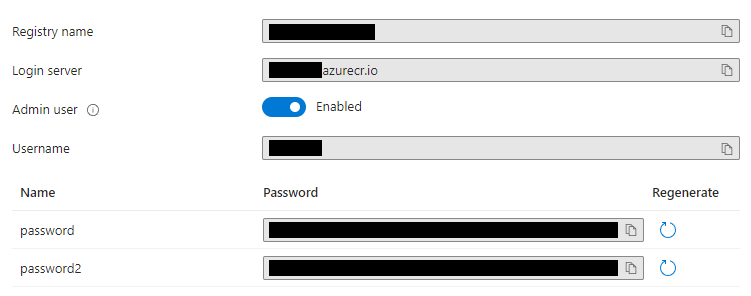
We will use the Login Server as the URI and Registry Name as the username to login along with the password.
There are two ways to login to your ACR. You can first login Azure using the Azure CLI command az login. Once logged in you can authenticate to your ACR using az acr login command.
~$ az login
~$ az acr login --name YOURACRNAME
Or you can also login just to your ACR by using the az acr login command. You will pass the name of your ACR which corresponds to the Login server in the image above. When prompted for username give it the username and password from your ACR.
~$ az acr login --name yourname.azurecr.io
Step 6
OK, we are finally ready to push our local image to our new ACR. Before we do, we need a new image tag that will correspond to our ACR. Let's create this new image tag based on the base image id from step 4.
~$ docker tag IMAGEID youracr.azurecr.io/ubuntu-ops:1.0.0
Now we can push the image to ACR with the docker push command.
~$ docker push youracr.azurecr.io/ubuntu-ops:1.0.0
If we navigate to our ACR we should see our image in the Azure Repository. Next time we will deploy a container as an ACI using this image.
- Details
- Hits: 2553
As most of you already know the "-ExpandProperty" parameter let's you enumerate the values of an incoming object as single value. For example, if you run the command below without the "-ExpandProperty".
Get-AzLocalNetworkGateway -ResourceGroupName "network-rg"
You will get output like this:
Name : my-lng
ResourceGroupName : network-pd-rg
Location : southcentralus
Id : /subscriptions/GUID/resourceGroups/network-pd-rg/providers/Microsoft.Network/localNetworkGateways/qco-houdc-lng
Etag : W/"GUID"
ResourceGuid : GUID
ProvisioningState : Succeeded
Tags :
Name Value
======================= =======
owner Network
external-facing No
cost-center IT
regulatory-data no
project-name PD
department IT
critical-infrastructure Yes
environment PD
GatewayIpAddress : 4.50.4.28
LocalNetworkAddressSpace : {
"AddressPrefixes": [
"10.100.0.0/16",
"10.101.0.0/16",
"10.102.0.0/16",
"10.103.0.0/16",
"10.104.0.0/16",
]
}
BgpSettings : null
But what if you just want a simple list of all LocalNetworkAddressSpace? You can use -ExpandProperty but the trick is you have to use it twice! See sample below. If you only pass it once you will still not get desired list, you must expand the properties two times because the expanded property is a list in this case.
Get-AzLocalNetworkGateway -ResourceGroupName "network-rg" | Select -ExpandProperty LocalNetworkAddressSpace | Select -ExpandProperty AddressPrefixes | FT
This will product the output desired as shown below.
10.100.0.0/16
10.101.0.0/16
10.102.0.0/16
10.103.0.0/16
10.104.0.0/16
Hope this helps someone!
- Details
- Hits: 1450
1. Create SSH Public/Private key pairs
2. Convert the public key to SSH2 format
ssh-keygen -e -f lx.pub
3. Verify permissions on private key are 600. If not, CHMOD to 600
chmod 600 /root/.ssh/mykey.private
4. SSH to VM via public IP or Private if you have VPN tunnel.
This email address is being protected from spambots. You need JavaScript enabled to view it.';document.getElementById('cloak8a2a7019da37c590aa60ac6d486c0581').innerHTML += ''+addy_text8a2a7019da37c590aa60ac6d486c0581+'<\/a>';
Azure also recently introduced the Azure Bastion service which allows RDP & SSH access to VMs via the portal using port 443.
- Details
- Hits: 4839
I have been hearing about containers for some time now but have been too busy with work (have not introduced containers yet...) to take a good look at this technology. I have spent a few weekends over the past ~6 months reading up on this technology including the different orchestration platforms like Docker Swarm or Kubernetes and I have to say I'm not only impressed with the varying possibilities but believe this could be one of the ways to safely migrate workloads to the public cloud without fear of vendor lock-in.
Although I'm no expert in this field right now I wanted to share a quick tutorial on getting Kubernetes installed and running on a vSphere environment. There are many tutorials on AWS & Azure but I did not find too many for vSphere which I think is important because this represents one way to have a private cloud presence.
Before jumping into steps let's take a look at a high-level conceptual diagram that shows what we are trying to accomplish. We need to deploy a kubernetes cluster to our vSphere environment. Next we will do a deployment using a pre-existing YAML file. This will provision a two node cluster running our deployment. Finally we will expose this deployment using a kubernetes service.

STEP 1 - k8s cluster on vSphere 6.x
The following guide is very good and it's what I used to get a k8s cluster setup on vSphere 6.0. https://github.com/kubernetes/kubernetes-anywhere/blob/master/phase1/vsphere/README.md
once you have k8s portal up you can test an nginx deployment and expose external with NodePort. No SLB required, although for production you would need some form of load balancing as unlike AWS or Azure there is no built-in support for automatic load balancing setup.
STEP 2 - k8s NodePort
The following guide was very helpful in understanding how to expose your k8s cluster to an external network. By default the k8s cluster is only available to the private network it resides in.
https://kubernetes.io/docs/tutorials/stateless-application/expose-external-ip-address/
STEP 3 - k8s deployment
The code below will create a simple nginx deployment. You can grab the yaml file here. You can create the file and save locally or point directly to URI.
kubectl create -f nginx-deployment.yaml #Create a new nginx deployment for testing
To view/verify new deployment run the command below. You should see output displaying the Name, Namespace, creation time, and other useful information.
kubectl describe deployment nginx-deployment #details of your deployment
Once we verify our deployment was successful we can start to gather the information we need to expose our deployment externally. Remember that by default our new deployment is only available inside the k8s internal network. The command below will get the we need to pass to the expose command. We see two deployments, we want the "nginx-deployment".
kubectl get deployments
NAME DESIRED CURRENT UP-TO-DATE AVAILABLE AGE
nginx-deployment 2 2 2 2 23d
rss-site 2 2 2 2 25d
STEP 4 - k8s service
Armed with the name we need to pass to the expose command we are now ready to proceed. the --name parameter is the name of your new "exposed" deployment, which is a k8s service now.
kubectl expose deployment nginx-deployment --type=NodePort --name=my-nginx
Now we should have a new service created called "my-nginx". Let's verify by running the command below. Verify the new service is displayed. You will see the cluster IP, this is an internal IP that you don't need to worry about at this time. Notice the EXTERNAL-IP is empty, this is normal. You do need to capture the Port mapping. The first port is the port in use by the nodes, the second is the mapped port. In this example the port mapping is 80:30575. The second port "30575" is the one we can use to access nginx from the external network.
kubectl get services
NAME CLUSTER-IP EXTERNAL-IP PORT(S) AGE
kubernetes 10.0.0.1 <none> 443/TCP 27d
my-nginx 10.0.4.97 <nodes> 80:30575/TCP 23d
The next step is to figure out which pods are running our nginx-deployment. The command below will do this for us. The command will output the status of the pod, age, IP (Internal IP), and node. At this time we are only interested in the Node, the IP is a private IP and not useful at this time.
STEP 5 - k8s external IP
kubectl get pods -o=wide
let's find where nginx is running and note the name of each pod.
kubectl get pods --namespace=default
We take the Names of the output from the above command and use below to find out the node and external IP.
kubectl describe pod nginx-deployment-4234284026-nwr2h --namespace=default|grep Node
The command below will also pull the IP Address.
kubectl describe node node3| grep Address
With the external IP of the VM running the node, we can then go to http://10.4.4.234:30575/ You can follow step 5 to get the name of the second node and find its external IP. The port will be the same on both nodes. You can now easily add a Netscaler, A10, F5 or other load balancer in front of the two nodes and along with DNS provide a friendly name for your cluster VIP.
- Details
- Hits: 2959
Helpful commands for docker newbies like myself.
# List all docker images you have.
PS C:\> docker images
REPOSITORY TAG IMAGE ID CREATED SIZE
nginx latest 46102226f2fd 12 days ago 109 MB
centos-rl latest 647c13af08c7 2 weeks ago 302 MB
ubuntu latest 6a2f32de169d 3 weeks ago 117 MB
centos latest a8493f5f50ff 4 weeks ago 192 MB
d4w/nsenter latest 9e4f13a0901e 7 months ago 83.8 kB
# Pull a new docker image:
PS C:\> docker pull <image_name>
# List docker containers both active and not actively running
PS C:\> docker ps -a
CONTAINER ID IMAGE COMMAND CREATED STATUS PORTS NAMES
c8ef567a8bdc centos-rl "/bin/bash" 3 hours ago Exited (0) 4 minutes ago centos-rl-tools
7f9f3afa7a3f nginx "nginx -g 'daemon ..." 4 hours ago Up 4 hours 0.0.0.0:32769->80/tcp nginx-the-cross.net
# Rename docker container
PS C:\> docker container rename Old-Name New-Name
# Remove a container
PS C:\> docker rm conainter_Name
or
PS C:\> docker rm conainter_ID
# Delete image
PS C:\> docker rmi Image_ID
# Run docker container on Windows 10 with host volume
PS C:\> docker run -it -v D:/docker/centos-rl:/data centos-rl
# The "run" command should only be used the very first time you run the image. This creates a new container.
PS C:\> docker start -i centos-rl-tools
# Use "start" for subsequent uses. This starts the container that was previously created. The image remains unmodified. Your volume will still be mapped, along with any other parameters you used with "run" command.
# Run docker container in detached mode:
PS C:\>docker run --name centos-rl -p 8080:80 -e TERM=xterm -d nginx
# To access the container:
PS C:\>docker exec -it <CONTAINER_ID> bash
# Export docker container to tar file.
PS C:\> docker ps -a #to list image name.
PS C:\> docker save -o D:/Temp/centos-rl.tar centos-rl
# Import/Load docker image
PS C:\> docker load -i D:/Temp/centos-rl.tar
Subcategories
- You are here:
-
Home

- Cloud