Azure has many options for running containers. Today we will look at the Azure Container Service (ACS). This is a very simple option for running a single container.
Prerequisites:
You will need the following items in order to successfully complete this tutorial.
- Azure Subscription with at least Contributor Role.
- An Azure Container Registry
- A Linux VM running Docker version 24.0.2 or newer.
- Sudo permissions on the Linux VM
- Azure CLI for Linux
For this example, I'm going to create an ubuntu based container using Docker version 24.0.2.
Step 1
Execute the following command:
~$ docker run -ti --name=ubuntu-ops ubuntu:latest
This will download the latest ubuntu image, start the container and drop you into a bash shell.
Step 2
Now you can configure your container with your app or service. Let's install nginx, but first run the update command and upgrade local packages if necessary and exit the container.
~$ apt update
~$ apt upgrade
~$ apt install nginx -y
~$ exit
Step 3
Now we need to commit the changes to this image. We do this by passing the name of the container we used in Step 1 to the docker commit command.
~$ docker commit ubuntu-ops
If the command is successful, you will see output that starts with "sha256" and a guid.
Step 4
Now that our container has been committed, we need to find the image id. We do this by running the docker images command. We are looking for the image that has REPOSITORY and TAG set to <none>. Copy the image id to your clipboard and run the following command to tag the image with new tag. I will be using ubuntu-ops-base as the name for my new base image. You can pass a version number with ":" followed by your version number.
~$ docker tag IMAGE_ID ubuntu-ops-base:1.0.0
You can then run the docker images command to verify the image has been updated with the new tag. You should see the new image with updated name and version number.
~$ docker images
Step 5
Now we need to login to the Azure Portal and create an Azure Container Registry where we can push our local image. Once this image is successfully pushed to our Azure Registry, we can deploy the image to an Azure Container Instance "ACI".
Creating an Azure container registry is super simple so I will not detail all the steps here. But once you have created the registry navigate to Settings > Access Keys and enable "Admin User" to allow you to easily authenticate to the registry. You can also use Tokens for little better security. Once you enable "Admin User" you should see the information required to login to your registry.
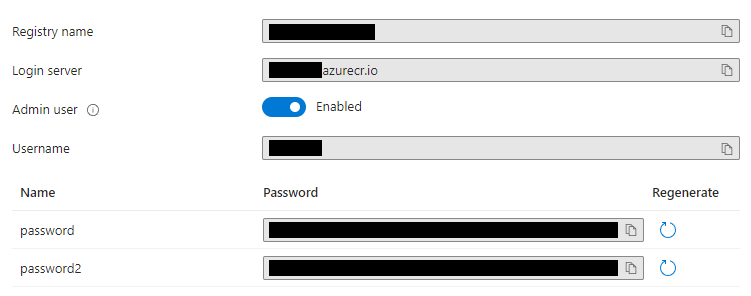
We will use the Login Server as the URI and Registry Name as the username to login along with the password.
There are two ways to login to your ACR. You can first login Azure using the Azure CLI command az login. Once logged in you can authenticate to your ACR using az acr login command.
~$ az login
~$ az acr login --name YOURACRNAME
Or you can also login just to your ACR by using the az acr login command. You will pass the name of your ACR which corresponds to the Login server in the image above. When prompted for username give it the username and password from your ACR.
~$ az acr login --name yourname.azurecr.io
Step 6
OK, we are finally ready to push our local image to our new ACR. Before we do, we need a new image tag that will correspond to our ACR. Let's create this new image tag based on the base image id from step 4.
~$ docker tag IMAGEID youracr.azurecr.io/ubuntu-ops:1.0.0
Now we can push the image to ACR with the docker push command.
~$ docker push youracr.azurecr.io/ubuntu-ops:1.0.0
If we navigate to our ACR we should see our image in the Azure Repository. Next time we will deploy a container as an ACI using this image.