I have been hearing about containers for some time now but have been too busy with work (have not introduced containers yet...) to take a good look at this technology. I have spent a few weekends over the past ~6 months reading up on this technology including the different orchestration platforms like Docker Swarm or Kubernetes and I have to say I'm not only impressed with the varying possibilities but believe this could be one of the ways to safely migrate workloads to the public cloud without fear of vendor lock-in.
Although I'm no expert in this field right now I wanted to share a quick tutorial on getting Kubernetes installed and running on a vSphere environment. There are many tutorials on AWS & Azure but I did not find too many for vSphere which I think is important because this represents one way to have a private cloud presence.
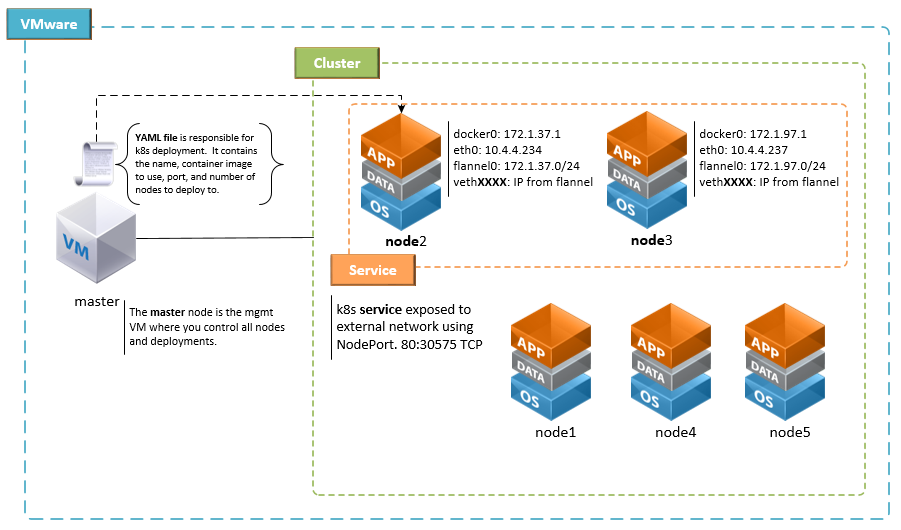
Before jumping into steps let's take a look at a high-level conceptual diagram that shows what we are trying to accomplish. We need to deploy a kubernetes cluster to our vSphere environment. Next we will do a deployment using a pre-existing YAML file. This will provision a two node cluster running our deployment. Finally we will expose this deployment using a kubernetes service.

STEP 1 - k8s cluster on vSphere 6.x
The following guide is very good and it's what I used to get a k8s cluster setup on vSphere 6.0. https://github.com/kubernetes/kubernetes-anywhere/blob/master/phase1/vsphere/README.md
once you have k8s portal up you can test an nginx deployment and expose external with NodePort. No SLB required, although for production you would need some form of load balancing as unlike AWS or Azure there is no built-in support for automatic load balancing setup.
STEP 2 - k8s NodePort
The following guide was very helpful in understanding how to expose your k8s cluster to an external network. By default the k8s cluster is only available to the private network it resides in.
https://kubernetes.io/docs/tutorials/stateless-application/expose-external-ip-address/
STEP 3 - k8s deployment
The code below will create a simple nginx deployment. You can grab the yaml file here. You can create the file and save locally or point directly to URI.
kubectl create -f nginx-deployment.yaml #Create a new nginx deployment for testing
To view/verify new deployment run the command below. You should see output displaying the Name, Namespace, creation time, and other useful information.
kubectl describe deployment nginx-deployment #details of your deployment
Once we verify our deployment was successful we can start to gather the information we need to expose our deployment externally. Remember that by default our new deployment is only available inside the k8s internal network. The command below will get the we need to pass to the expose command. We see two deployments, we want the "nginx-deployment".
kubectl get deployments
NAME DESIRED CURRENT UP-TO-DATE AVAILABLE AGE
nginx-deployment 2 2 2 2 23d
rss-site 2 2 2 2 25d
STEP 4 - k8s service
Armed with the name we need to pass to the expose command we are now ready to proceed. the --name parameter is the name of your new "exposed" deployment, which is a k8s service now.
kubectl expose deployment nginx-deployment --type=NodePort --name=my-nginx
Now we should have a new service created called "my-nginx". Let's verify by running the command below. Verify the new service is displayed. You will see the cluster IP, this is an internal IP that you don't need to worry about at this time. Notice the EXTERNAL-IP is empty, this is normal. You do need to capture the Port mapping. The first port is the port in use by the nodes, the second is the mapped port. In this example the port mapping is 80:30575. The second port "30575" is the one we can use to access nginx from the external network.
kubectl get services
NAME CLUSTER-IP EXTERNAL-IP PORT(S) AGE
kubernetes 10.0.0.1 <none> 443/TCP 27d
my-nginx 10.0.4.97 <nodes> 80:30575/TCP 23d
The next step is to figure out which pods are running our nginx-deployment. The command below will do this for us. The command will output the status of the pod, age, IP (Internal IP), and node. At this time we are only interested in the Node, the IP is a private IP and not useful at this time.
STEP 5 - k8s external IP
kubectl get pods -o=wide
let's find where nginx is running and note the name of each pod.
kubectl get pods --namespace=default
We take the Names of the output from the above command and use below to find out the node and external IP.
kubectl describe pod nginx-deployment-4234284026-nwr2h --namespace=default|grep Node
The command below will also pull the IP Address.
kubectl describe node node3| grep Address
With the external IP of the VM running the node, we can then go to http://10.4.4.234:30575/ You can follow step 5 to get the name of the second node and find its external IP. The port will be the same on both nodes. You can now easily add a Netscaler, A10, F5 or other load balancer in front of the two nodes and along with DNS provide a friendly name for your cluster VIP.